
- Science Toys
- Magnetism
- Electromagnetism
- Electrochemistry
- Radio
- Thermodynamics
- Aerodynamics
- Light and optics
- Simple laser communicator
- Make your own 3D pictures
- Making permanent rainbows.
- A solar powered marshmallow roaster
- Make a spectroscope from a CD.
- The impossible kaleidoscope
- Make a solar hotdog cooker
- Exploring invisible light
- A high resolution spectrograph.
- Time-lapse photography.
- High speed photography.
- Stacking photos for high depth of field.
- Biology
- Mathematics
- Computers and Electronics
A magnet in mid-air.
 Floating in mid-air between two metal plates,
a tiny magnet bobs and spins in the wind from
the viewer's breath.
No batteries are used, no electromagnets, no
supercooled superconducting materials, just
some easy to obtain materials from local stores.
Floating in mid-air between two metal plates,
a tiny magnet bobs and spins in the wind from
the viewer's breath.
No batteries are used, no electromagnets, no
supercooled superconducting materials, just
some easy to obtain materials from local stores.

Shopping list
- 12 ceramic ring magnets (Radio Shack)
- tiny neodymium-iron-boron magnet (Radio Shack) [The tiny rare-earth magnets shown in these photos are much stronger than the Radio Shack magnets, and can be found in our catalog. If using the Radio Shack magnets, you may need a stronger top magnet, and a taller support column.]
- 8 inches of 1/4 inch threaded brass rod
- 4 brass hex nuts to fit the 1/4 inch rod
- 2 brass or nylon washers to fit the brass rod
- wooden base (5 inch square, 3/4 inch high)
- 6 to 8 inch wooden support, 2 inches square
- 5 by 2 inch wooden block, 3/4 inch thick
- 2 tablespoons of Bismuth (non-toxic bird shot (from a gun shop or sporting goods store) or in our catalog.
- wood glue
- 1/4 inch drill bit and drill
- large cheap cooking spoon (we will ruin it)
- empty aluminum soda can
- coarse sandpaper or large metal file
- Titebond wood glue (or similar brand)
- 5 minute epoxy
Assembly
The heart of the device are the Bismuth plates. These are what make the magnetic suspension possible. Bismuth is very similar to lead. It is easy to melt, and is as heavy and hard as lead. Because lead is toxic and bismuth is not (it is the active ingredient in the Pepto-Bismol medicine for upset stomach), it is used in environmentally safe bird shot for hunters. It is in this form that it is most easily found at gun shops and sporting goods stores. We have obtained some and offer small amounts in our catalog. Bismuth is also used in some fishing lures as a replacement for lead. This toy uses bismuth because of its special magnetic properties. [Don't forget to read the next page, where we do the same project with another substance called pyrolytic graphite.]Melting and casting the bismuth
The first step in assembling the levitator is to melt the bismuth and pour it into a mold to make the two suspension plates. The mold is the bottom of an aluminum soda can, which has a convenient dimple that is about the right size. You can use other molds if you wish, such as aluminum muffin tins, but remember that they will not be suitable for their normal uses afterwards. Don't use something the cook thinks is precious. Place about a tablespoon of bismuth shot into the cheap spoon purchased for this purpose (don't use the cook's favorite spoon). Heat the shot in the spoon over a stove or propane torch until it melts. A bit of coathanger wire can be used at this point to rake the slag (bismuth oxides) off of the top of the melted metal and onto the side of the spoon.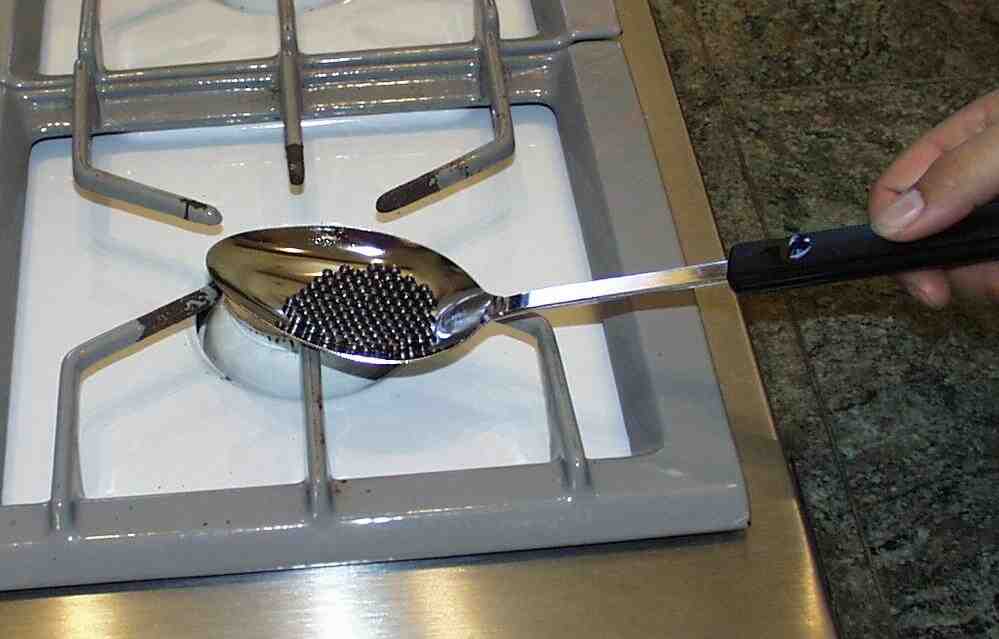 Next, carefully move the spoon over to the upside-down aluminum
can, and pour the metal into the hollow in the bottom of the can.
Next, carefully move the spoon over to the upside-down aluminum
can, and pour the metal into the hollow in the bottom of the can.
 Let the metal cool until it hardens, and the can is cool enough
to hold. Only after the metal is completely solid can it be
held under running water and pried out of the mold.
Let the metal cool until it hardens, and the can is cool enough
to hold. Only after the metal is completely solid can it be
held under running water and pried out of the mold.
 Use the sandpaper or a metal file to make the top and bottom surface
of the metal nice and flat.
Make another bismuth disk like the first one.
Use the sandpaper or a metal file to make the top and bottom surface
of the metal nice and flat.
Make another bismuth disk like the first one.
Building the support structure
Drill a 1/4 inch hole in one end of the 2 inch by 5 inch block, about 3/4 of an inch from the edge. This will accept the brass rod. Glue the 6 inch 2 by 2 support block to the base. Glue the 2 by 5 block to the top of the support block, leaving the end with the hole free. Allow the glue to dry. If you are very sparing with the glue, using only a very thin layer, the drying will only take a few minutes. I use Titebond wood glue.Assembling the magnet stack
Insert the brass rod into the hole in the wood block. Thread one nut onto the rod from above, and two from below. Place a washer onto the rod from below, followed by the twelve magnets, and another washer, then the final nut. The last nut should be close to the end of the rod. Tighten it by hand so as not to shatter the ceramic magnets. Don't worry yet about getting the top two nuts tight around the wood block, since we will be adjusting the height of the magnet soon.
Assembling the bismuth plates
The levitator is very sentitive to three things: the distance between the two bismuth disks, and the height and strength of the magnet above them. The disks are kept apart by three spacers. These can be made from three pieces of bismuth shot, although wood or plastic would work fine. The spacing between the disks should be very close, leaving only a very small space for the magnet. If the distance is too far, the magnet will jump from the bottom to the top, or fall from the top to the bottom, instead of floating between the disks in mid-air. If the magnets are very strong and far away, the distance between the bismuth disks can be increased. Using the 5 minute epoxy, glue the three pieces of shot to the bottom bismuth disk, as far away from each other as possible, in an equilateral triangle. Once the epoxy has completely hardened (give it 10 minutes to be safe) start filing or sanding the tops of the shot, to make them just tall enough so the tiny neodymium magnet can fit with only a little room to spare. If you stack two of the tiny magnets together, they should just fit, touching both plates (only one magnet will actually be used).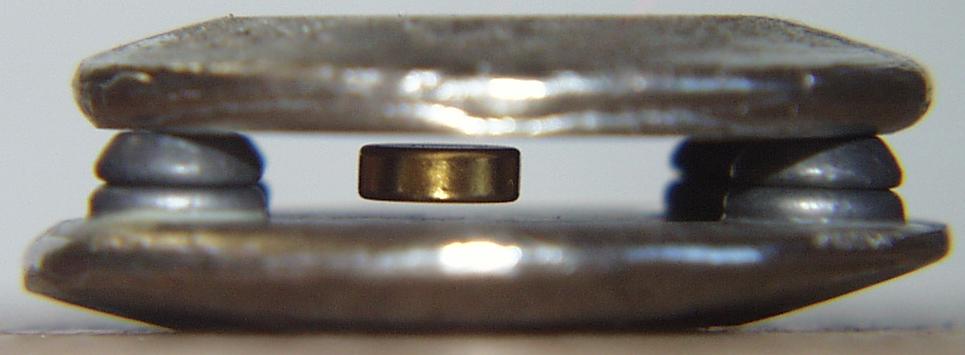
Adjusting the magnets for levitation
Hold the top bismuth disk in one hand, just under the stack of ring magnets. Let the small neodymium magnet stick to the bottom of the bismuth disk, attracted to the ring magnets. Now set the top bismuth disk onto the three supports on top of the bottom disk. The tiny magnet may drop to the bottom disk, or it may remain stuck to the top disk. If the tiny magnet falls to the bottom disk, lower the ring magnet assembly slowly by turning the rod while holding the top nut. If the tiny magnet remains stuck to the top disk, raise the ring magnet assembly by turning the rod and holding the top nut. At one point while turning the rod, the magnet will start to levitate between the disks. The levitating disk is very sentitive to slight changes in the height of the ring magnet assembly. The rod must be turned very slowly to make tiny adjustments to the height of the neodymium magnet.How does it do that?
The bismuth disks are diamagnetic. This means that they push away from a magnet. It doesn't matter whether the north pole of the magnet or the south pole is used, the bismuth always pushes away. The diamagnetism is very weak, even in bismuth, which has the strongest diamagnetism of any metal. This is why the adjustment is so sensitive. The ring magnets attract the small neodymium magnet with just exactly the right amount of force to counteract gravity. However, if the bismuth disks were not there, the tiny magnet would jump up to the ring magnets, because as it gets closer, the force is stronger. Right at the critical point, where the magnetic pull just barely counteracts gravity, the weak diamagnetism of the bismuth is enough to keep the magnet from jumping up to the ring magnets, or falling down. The magnet thus floats, being repelled by the top and bottom bismuth disks.Troubleshooting
The most common problem in building the device is that the floating magnet will either stick to the top bismuth plate, or stick to the bottom bismuth plate, but never hover in between them. That happens because the plates are too far apart for the strength of the top magnet. You can either put the plates closer together, or (better) make the top magnet stronger by adding more magnets, or using more powerful magnets, or both. The stronger the top magnets, the farther they can be from the floating magnet and still lift it. As the top magnet gets stronger and farther away from the floating magnet, the area where the floating magnet can be stabilized increases. The magnetic field is bigger and spreads out more, and so the floating magnet can move up and down more before the strength of the field changes enough to make it fly up or fall down. We say the rate of change of the magnetic field gradient is weaker if the top magnet is farther away. The gradient is just how much the strength of the field changes with distance.A video
Below is a picture of a slightly different model I built, where I embedded brass wire into the bismuth before it cooled. This is a little harder to adjust than the first model, since the brass wire is springy, but it works pretty well. The floating magnet is a tiny gold plated cube of neodimium-iron-boron supermagnet, so the faces of the cube catch the light as it rotates. (These are available in our catalog.) If you click on the picture, you can see it move in the video.
[Click on photo for video] Next: More suspension: Pyrolytic Graphite Order super magnets and bismuth here.
Print save the date magnets
or promotional magnets for your event from PsPrint.com
- High-quality magnets will make your message stick.
Del.icio.us
- Science Toys
- Magnetism
- Electromagnetism
- Electrochemistry
- Radio
- Thermodynamics
- Aerodynamics
- Light and optics
- Simple laser communicator
- Make your own 3D pictures
- Making permanent rainbows.
- A solar powered marshmallow roaster
- Make a spectroscope from a CD.
- The impossible kaleidoscope
- Make a solar hotdog cooker
- Exploring invisible light
- A high resolution spectrograph.
- Time-lapse photography.
- High speed photography.
- Stacking photos for high depth of field.
- Biology
- Mathematics
- Computers and Electronics
Some of my other web sites:

Send mail to Simon Quellen Field via [email protected]