- Science Toys
- Magnetism
- Electromagnetism
- Electrochemistry
- Radio
- Thermodynamics
- Aerodynamics
- Light and optics
- Simple laser communicator
- Make your own 3D pictures
- Making permanent rainbows.
- A solar powered marshmallow roaster
- Make a spectroscope from a CD.
- The impossible kaleidoscope
- Make a solar hotdog cooker
- Exploring invisible light
- A high resolution spectrograph.
- Time-lapse photography.
- High speed photography.
- Stacking photos for high depth of field.
- Biology
- Mathematics
- Computers and Electronics
A flat panel solar cell
I made a more portable version of the solar cell in a flat panel form. I used the clear plastic top from a plastic CD jewel case as the window, and lots of silicone rubber glue to both attach the pieces together and to insulate them from each other.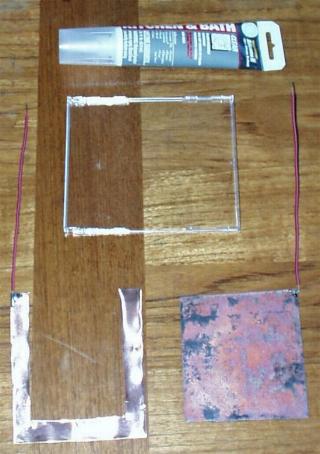 The first step is to make a cuprous oxide plate like we did in the
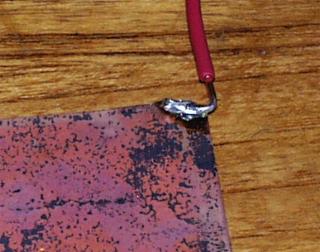
first solar cell. This time I sanded one corner clean all the way
down to the shiny copper, and soldered an insulated copper wire to
it for the negative lead.
The first step is to make a cuprous oxide plate like we did in the
first solar cell. This time I sanded one corner clean all the way
down to the shiny copper, and soldered an insulated copper wire to
it for the negative lead.
 The positive plate is a U shaped piece cut from the copper sheeting,
a little bit larger than the cuprous oxide plate, with the cutout
portion of the U a little bit smaller than the cuprous oxide plate.
Another insulated copper wire is soldered to one corner of the U.
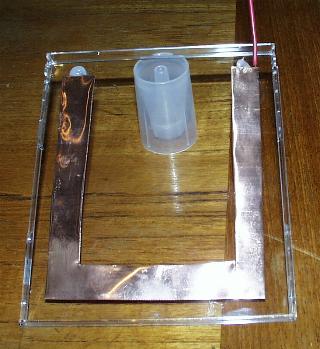
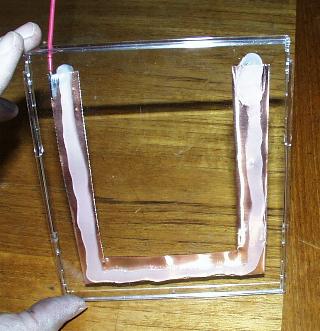
The first step in construction is to glue the U shaped copper plate
to the plastic window. Use plenty of silicone glue, so the saltwater
won't leak out. Make sure that the solder connection is either
completely covered with glue, or is outside of the glue U, as shown
in the photo (completely covered in glue is best).
The photo below shows the back side of the solar cell (the side not
facing the sun) at this point in the construction.
The positive plate is a U shaped piece cut from the copper sheeting,
a little bit larger than the cuprous oxide plate, with the cutout
portion of the U a little bit smaller than the cuprous oxide plate.
Another insulated copper wire is soldered to one corner of the U.
The first step in construction is to glue the U shaped copper plate
to the plastic window. Use plenty of silicone glue, so the saltwater
won't leak out. Make sure that the solder connection is either
completely covered with glue, or is outside of the glue U, as shown
in the photo (completely covered in glue is best).
The photo below shows the back side of the solar cell (the side not
facing the sun) at this point in the construction.
 The photo below shows the front side of the solar cell (the side that
will face the sun) at this point in the construction. Notice that the
silicone glue does not completely cover the copper, since some of the copper
must eventually be in contact with the saltwater.
The photo below shows the front side of the solar cell (the side that
will face the sun) at this point in the construction. Notice that the
silicone glue does not completely cover the copper, since some of the copper
must eventually be in contact with the saltwater.
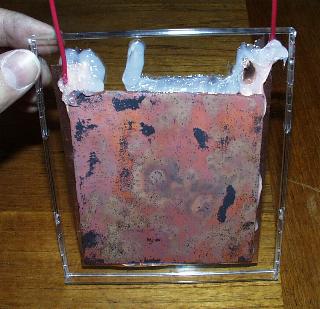
 The next step is to lay a good size bead of glue onto the U
shaped clean copper plate. This layer will act as an insulator
between the clean copper plate and the cuprous oxide plate, and
must be thick enough to leave some room for the saltwater. Again,
not all of the copper is covered, so there will be plenty of copper
in contact with the saltwater.
Gently press the cuprous oxide plate onto this layer of glue.
You should press hard enough to make sure the glue seals off
any gaps, but not so hard that the two plates touch.
The photo below shows the back side of the solar cell (the side not
facing the sun) at this point in the construction.
The next step is to lay a good size bead of glue onto the U
shaped clean copper plate. This layer will act as an insulator
between the clean copper plate and the cuprous oxide plate, and
must be thick enough to leave some room for the saltwater. Again,
not all of the copper is covered, so there will be plenty of copper
in contact with the saltwater.
Gently press the cuprous oxide plate onto this layer of glue.
You should press hard enough to make sure the glue seals off
any gaps, but not so hard that the two plates touch.
The photo below shows the back side of the solar cell (the side not
facing the sun) at this point in the construction.
 The photo below shows the front side of the solar cell (the side that
will face the sun) at this point in the construction. Note that I added
extra glue to form a funnel at the top to allow the saltwater to be
added.
The photo below shows the front side of the solar cell (the side that
will face the sun) at this point in the construction. Note that I added
extra glue to form a funnel at the top to allow the saltwater to be
added.
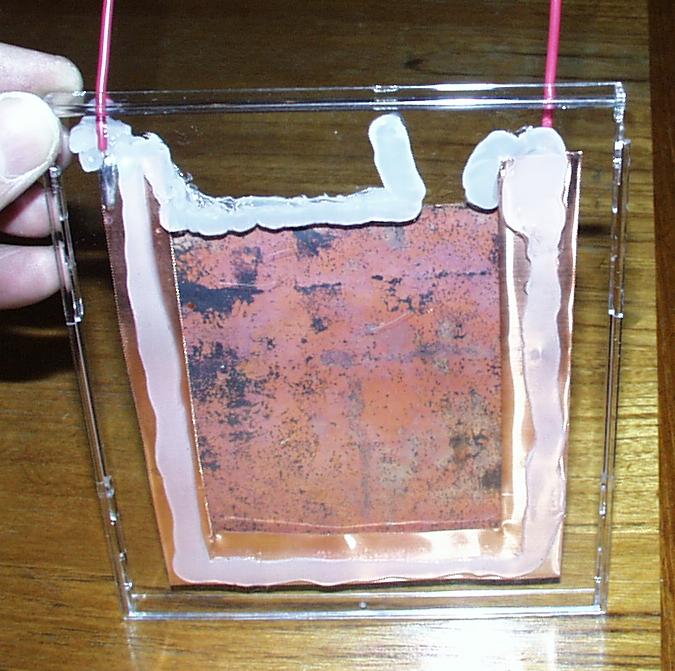 You can click on the photo above to get a bigger picture.
Not shown in the photo is a generous extra bead of glue all around
the outside of the plates, to ensure that no saltwater will leak out.
Allow the glue to cure before going on to the next step.
Next, use a large eyedropper to add the saltwater. Fill the cell up
almost to the top of the copper plate, so it almost spills out. Then
seal the funnel with another generous bead of glue, and allow the glue
to cure at least a half hour.
You can click on the photo above to get a bigger picture.
Not shown in the photo is a generous extra bead of glue all around
the outside of the plates, to ensure that no saltwater will leak out.
Allow the glue to cure before going on to the next step.
Next, use a large eyedropper to add the saltwater. Fill the cell up
almost to the top of the copper plate, so it almost spills out. Then
seal the funnel with another generous bead of glue, and allow the glue
to cure at least a half hour.
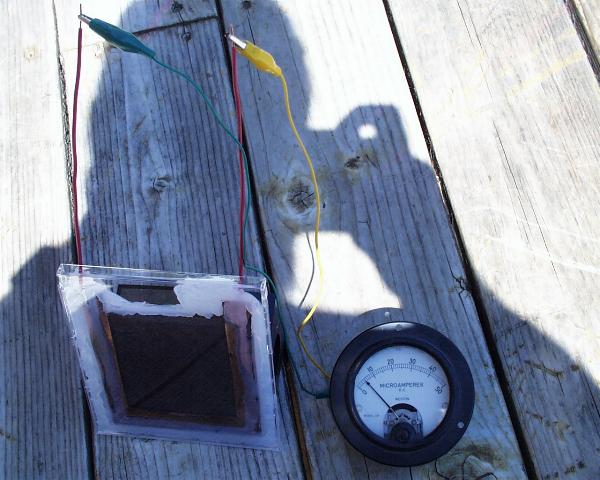
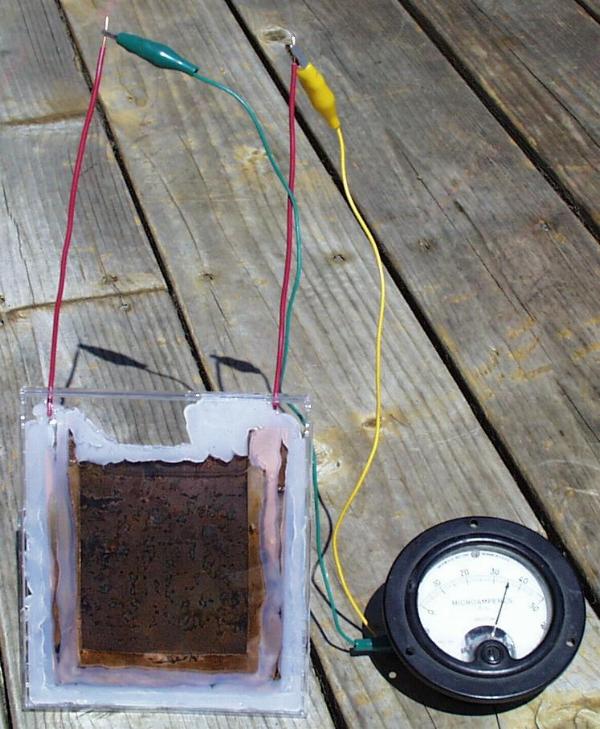 In the photo above you can see the flat panel solar cell in action in
the bright sun. It is delivering about 36 microamperes of current. You
can also see the extra bead of glue around the edges of the plates, and
filling the top of the funnel.
In the photo above you can see the flat panel solar cell in action in
the bright sun. It is delivering about 36 microamperes of current. You
can also see the extra bead of glue around the edges of the plates, and
filling the top of the funnel.
 Finally, another shot of the author's shadow. Note that the meter
now reads about 4 microamperes, since no sunlight is falling on it.
Finally, another shot of the author's shadow. Note that the meter
now reads about 4 microamperes, since no sunlight is falling on it.
A note about power
Many readers were jumping straight to this page without reading the previous project, so I am repeating this note here: The cell produces at most about 50 microamps at 0.25 volts.This is 0.0000125 watts (12.5 microwatts).
Don't expect to light light bulbs or charge batteries with this device. It can be used as a light detector or light meter, but it would take acres of them to power your house. The 0.0000125 watts (12.5 microwatts) is for a 0.01 square meter cell, or 1.25 milliwatts per square meter. To light a 100 watt light bulb, it would take 80,000 square meters of cuprous oxide for the sunlit side, and 80,000 square meters of copper for the dark electrode. To run a 1,000 watt stove, you would need 800,000 square meters of cuprous oxide, and another 800,000 square meters of plain copper, or 1,600,000 square meters all together. If this were to form the roof of a home, each home would be 282 meters long and 282 meters wide, assuming all they needed electricity for was one stove. There are 17,222,256.7 square feet in 1,600,000 square meters. If copper sheeting costs $5 per square foot, the copper alone would cost $86,110,283.50 USD. Making it one tenth the thickness can bring this down to $8,611,028.35. Since you are buying in bulk, you might get it for half that, or about $4,300,000.00. If you used silicon solar panels costing $4 per watt, you could run the same stove for $4,000.00. But the panels would only be about 10 square meters. Or, for about a dollar, you can build a solar stove out of aluminum foil and cardboard. For about $20, you can build a very nice polished aluminum parabolic solar cooker. Next: Build a Hydrogen Fuel Cell. Del.icio.us
- Science Toys
- Magnetism
- Electromagnetism
- Electrochemistry
- Radio
- Thermodynamics
- Aerodynamics
- Light and optics
- Simple laser communicator
- Make your own 3D pictures
- Making permanent rainbows.
- A solar powered marshmallow roaster
- Make a spectroscope from a CD.
- The impossible kaleidoscope
- Make a solar hotdog cooker
- Exploring invisible light
- A high resolution spectrograph.
- Time-lapse photography.
- High speed photography.
- Stacking photos for high depth of field.
- Biology
- Mathematics
- Computers and Electronics
Some of my other web sites:

Send mail to Simon Quellen Field via [email protected]