Heat engines take many forms, from the internal combustion engine in the family car to the giant turbines that generate electricity for our homes. What they have in common is they steal some of the energy moving between something hot and something cold, and convert it into motion.
When you heat a gas like air or steam, the molecules in the gas move around faster. The faster they move, the harder they hit anything that is in the way. If we put something in the way, such as a propellor or a pinwheel, we can make them spin (this is how turbine generators spin to create electricity). If we confine the gas in a container with a lid, we can pop the lid off (this is how the engine in a car works). If we let the fast moving molecules push on one side of a container, and escape through a small hole on the other side (so they are pushing on one side more than on the other) then we have a rocket or a jet, which moves in a direction away from the side with the hole.
n this chapter we will make a working version of the first heat engine (a form of steam turbine), a gas turbine engine that runs from the small heat difference between your warm hand and the cooler air around it, and some tiny rockets that can be made in the kitchen in a couple minutes, and then shoot across a driveway.
Hero's steam engine.
In the first century AD, the mathematician Hero of Alexandria described a device called the aeolipile, in which steam was conducted through pipes from a boiler to a sphere which had two jets from which the steam could escape.
Hero's steam engine was probably a toy (if it was ever actually built) and not put to any useful purpose. Continuing in that fine tradition, we will build a version of his engine for the same purpose. Our version will be much simpler to build, since we will need no steam-proof bearings for an axle.
We start with a tin can. The can will be both the boiler and the rotating part with the jets. This simplification eliminates any need for steam to enter the jet chamber through tight fitting bearings. We insert two thin brass tubes into the can near the top, and opposite one another. We bend the tubes so they are tangent to the can, and crimp them almost shut, so the steam pressure can build up inside the can.
I have made several aeolipiles from various tin cans, and some work better than others. Small cans like those tomato sauce comes in work well, but they have no convenient screw tops through which to add water. One must draw the water in through one tube by sucking on the other, which is not a very dignified way to show off first century high technology. The best can I have found to date is a small can used to hold 'Oatey Purple Primer', a solvent for PVC plumbing pipe. This product is inexpensive, and easy to find in most hardware stores. Pour out the contents into a jar and give it to your favorite plumber, and wash out the can well.
The Oatey can has a wire soldered to the lid, and a ball of fibers at the other end of the wire to act as a brush for applying the primer. Cut the wire off as close to the lid as possible using diagonal wire cutters. Purists may unsolder the wire, but this takes longer. Dispose of the wire, we won't be needing it.
Next we use a very small nail (actually I usually use an old jeweller's screwdriver, but a small nail works fine) to punch two holes near the top of the can (1/8th of an inch from the top, so we have a little wiggle room). The holes must be directly across from one another, or the engine will wobble a lot (it will wobble a lot anyway, so don't worry too much about precision). Two small brass tubes, about one inch long and as thin as you can find now go into the holes, one tube in each hole. The brass tubing can be found in most hobby stores. It can be cut with the diagonal cutters, but then one end must be filed down so it is wide open. The other end can be opened by squeezing it with a pair of pliers, since we don't want it open all the way. The tiny opening you get by squeezing makes a perfect nozzle for the steam to escape.
The wide open end of the tube goes inside the can, and the nozzle end sticks out. The tubes are pressed against the can so they are tangent to the can, rather than sticking out straight.
Now we solder the tubes to the can. Use a high wattage soldering gun or iron (the Radio Shack 100 watt soldering gun works great), since the can will absorb a lot of heat, and the little soldering pencils used for fine work in printed circuit boards aren't good for the kind of plumbing we are doing. Always use lead-free solder on any toy or object that will be handled, especially by children, who are more sensitive to lead poisoning.
Now solder a length of beaded brass chain (the kind used as a pull chain to turn lights on and off) to the top of the lid, in the center. This chain will act as a support to hold up the engine, and as a bearing, to allow the engine to spin. I have tried fishing swivels, and they work, but the chain has less friction, and is cheaper (unless you have some fishing swivels lying around).
I usually solder the connector of the chain to the lid, since it is easier to handle with a pair of long nosed pliers. But if you are making more than one engine from one chain, you can simply solder one of the beads to the lid, taking care that the hole in the bead where it connects to the rest of the chain is straight up. The chain can be anything from 3 inches to a foot long, depending on how far up you want to put the support (which we will describe later).
Next take the lid of the can and use it to trace a circle around some rubber sheet, either a piece of an old inner tube, or a bit from a tire patch kit. Cut out the circle and push it into the lid of the can as a seal (called a gasket) to keep the steam from coming out where it shouldn't.
The support is made of three pieces of wood. One piece is the base, which can be any flat piece of wood such as a 2x4. I found some nice pieces in a hobby store that had been shaped for plaques that work nicely. The base should be large enough that the engine does not topple over as it wobbles around. A minimum is probably 3 by 5 inches.
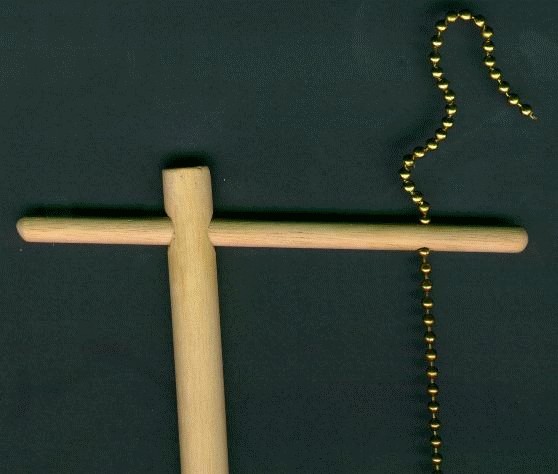
Two wooden dowels form the rest of the support. One dowel is a half inch or more in diameter and about 15 inches long, and forms the mast. Drill a hole in the base that fits the mast snuggly. If the fit is not tight, you can use glue to hold the pieces together. The last piece is a small dowel about 5 inches long and a quarter of an inch in diamter. Drill a quarter inch diameter hole in the mast about an inch from the top, and force the small dowel into it. The fit does not have to be snug, but a snug fit will keep the pieces together when the engine is transported. Do not glue this part, since it will be adjusted later.
The small dowel must also have a hole drilled through it about an inch from the end. This hole should be just a little larger than the beaded chain, since the chain will be threaded through this hole. If the fit is a little snug, you will not need anything more to hold the chain in place. If it is loose, then a little bit of wire can be wrapped around the chain above the hole to keep the chain from falling through when the can is full of water.
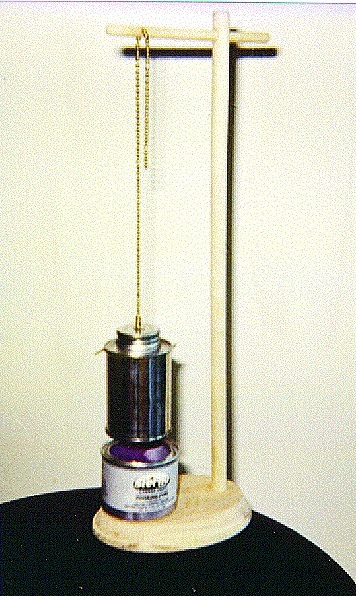
With the large dowel snug in the hole in the base, and the smaller dowel fitting in the hole near the top of the larger dowel, the chain now suspends the can a little above the base. Raise the chain enough to fit a small can of Sterno (jellied alcohol, used to keep food warm at buffets) under the Oatey can. Leave about a half of an inch between the two cans so air can get to the alcohol.
Now fill the can with water, tighten the lid firmly, and light the Sterno to boil the water in the steam engine. If the can is full of water it will take a few minutes to boil. If the can has only a half inch or so of water, it will boil much sooner. Be careful not to let the can run dry, or the can will become an ugly color, the solder will melt, and the rubber gasket will smoke and stink.
As the water boils, the can will start to spin. The steam coming out the brass tubes should be cool enough to touch (I'll explain why later). If the steam does not exit with enough force to spin the can, there may be too much friction on the chain (too short a chain, not a brass chain, too heavy a can) but more likely the problem is with the nozzles. The nozzles must have very small openings, so the steam pressure can build up in the can, making the steam exit the nozzles at high speed. Try pinching the nozzles shut a little more using a pair of pliers. Make sure there is some small hole in each, or the can will rupture from the pressure. I have built several of these, and all of them worked the first time, although the ones with the smallest holes spin fastest.
As the can spins faster and faster, it will start to wobble. Even if you have built everything with the utmost precision, the water in the can is boiling, and there will be bubbles that make one side lighter than the other. You can ease the wobble quite a bit by holding the chain near the can, so the effective length of the chain is shorter. Be careful not to touch anything hot.
Why does it do that?
As the water heats up, the molecules of water move faster. When the water boils, the molecules are moving too fast to stay stuck together as a liquid, and they move about freely as steam. The fast moving water molecules are bouncing around in the can, hitting the walls of the can from all directions. Because they hit the top as often as they hit the bottom, the can neither moves up nor down.
But there is one direction in which the molecules don't hit anything. This is the direction where the holes in the tubes are. Instead of hitting a wall of the can, the molecules hit nothing, and exit out into the air. The molecules in the can are pushing on all the walls the same amount, except where the holes are. Because nothing is pushing in that direction, there is nothing to hold the can back, and it moves away from the holes in the tubes.
Imagine a big box on the floor, with no top, no bottom, and one wall missing. Imagine inside the box are ten little kids, all running in different directions. When a kid runs into the wall of the box, the box moves a little bit, and the kid bounces off the wall and runs in another direction. Let's call the walls the left wall, the right wall, and the front wall. The back wall is the one that is missing. Some kids will hit the left wall, and the box will move to the left. Some kids will hit the right wall, and the box will move to the right. These movements will cancel each other out, and the box will stay in the center of the room. Each time a kid hits the front wall, the box will move towards the front. But since there is no back wall, no kids will ever move the box back. The result is a box that is moving across the room.
Rockets and jets move the same way the box moves. A rocket can work in outer space because it does not need to push against air or the ground. It works because the molecules inside the rocket are pushing in every direction except out the back. Our steam engine works because it has two rockets (the brass tubes) pushing the sides of the can in opposite directions, causing it to spin.
Why is the steam cool when it comes out?
The steam is hot inside the can because of two things: the speed of the molecules, and the number of molecules crammed into that little space. The speed of the molecules is what creates the temperature. But temperature alone is not what burns your fingers. You need a lot of fast moving molecules hitting your fingers before you can feel it as heat.
When the fast moving molecules of steam leave the nozzles, they spread out in all directions as they run into the slow moving air molecules outside the can. What you feel with your hand is the steam molecules that have slowed down in the air, and the air molecules they bumped into and caused to move. Not only have they slowed down by the time they hit your hand, but they have spread out so they don't all hit the same place. The combination of moving slowly and spreading out makes them feel cool on your hand.